

Continuamos con el post numero dos de la sección Mi Aplicación Android con Twiter , en este caso tenemos aquí un feed de twitt´s con la palabra que introduzcamos en nuestra aplicación.
Mi aplicación Android con twitter :
Feed de una etiqueta.
Twitter es uno de esos servicios, con diferentes APIs para acceder a los tweets y los distintos apartados de su plataforma. Vamos a capturar la entrada del usuario y crear el URL para su uso en una solicitud HTTP a la URL de búsqueda de Twitter :

Antes de seguir, he de decir que me ha costado bastante sacar este código, no todo es mío, he de agradecer la aportación de varios colegas en Gilthub, que no tenía mucha fé en esta plataforma pero resulta super útil.
El tratamiento es complicadillo y se requiere tiempo para estudiar el código, sino se tienen conocimientos avanzados de Java, será imposible tratar el código de manera correcta.También hay que decir que antes de estar liado con esto,hay que saber si se tienen las claves de autentificación en Twitter,
¿Cómo las conseguimos?
Aquí.
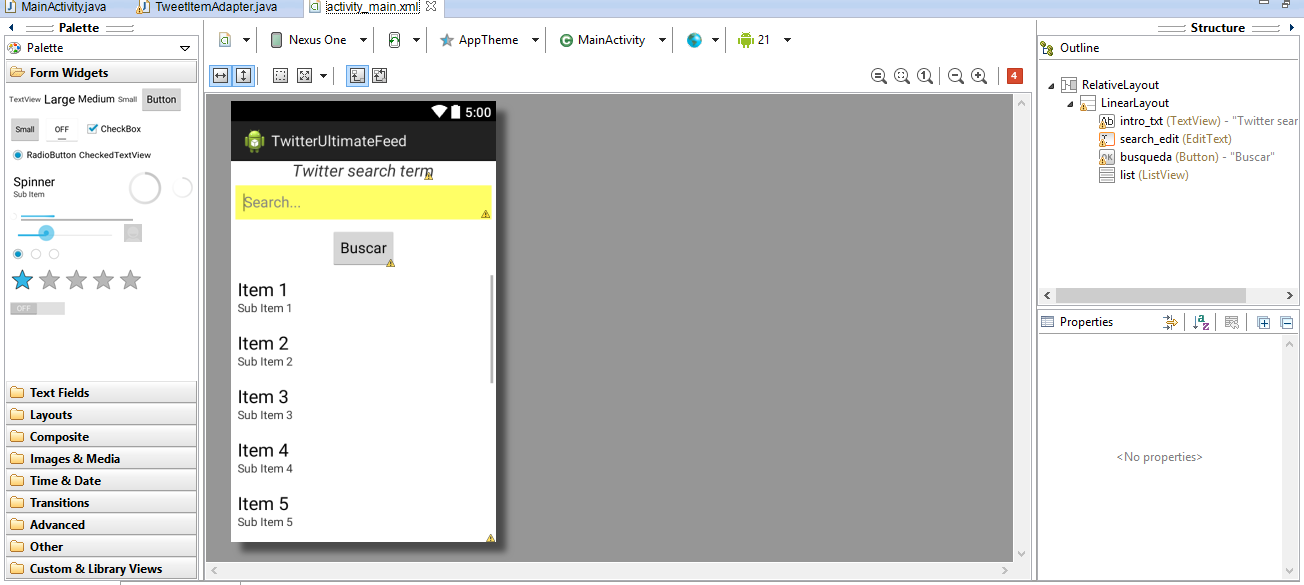
Voy a comentar brevemente la función de la aplicación :
Nosotros tenemos un EditText donde introduciremos la etiqueta que queremos buscar, y al darle al botón realizará las operaciones necesarias para poder conectarnos a Twitter con nuestras CUSTOM_KEY y SECRET_KEY, una vez autentificados, tendremos los privilegios necesarios para poder listar los tweets mediante un objeto JSON de una determinada etiqueta.
Antes de nada hay que descargarse bastantes librerías, importarlas al proyecto y parsearlas al mismo mediante Java Build Path (botón derecho sobre el proyecto, propiedades). Estas librerías son las que necesitamos para usar JSON y otras para interactuar con el framework de Twitter. Destaco que estoy en la version Android 5.
- gson-2.3.jarhttpclient-4.0.1.jar
- jackson-core-2.3.0.jar
- json_simpe-1.1.jar
- json-smart-1.1.1.jar
- twitter4j-core-4.0.2.jar
Las he comprimido en un .rar y las podeis descargar desde aquí.
DESCARGAR LIBRERIAS PARA JSON DESDE AQUI Y AQUI

También hay que dar permisos de Internet a la aplicación.
    <uses-permission android:name="android.permission.INTERNET"/>
    <uses-permission android:name="android.permission.ACCESS_NETWORK_STATE"/>
xmlns:tools="http://schemas.android.com/tools"
android:layout_width="match_parent"
android:layout_height="match_parent"
tools:context="com.example.tweetfeed.MainActivity" >
<LinearLayout
android:layout_width="fill_parent"
android:layout_height="wrap_content"
android:orientation="vertical" >
<TextView
android:id="@+id/intro_txt"
android:layout_width="wrap_content"
android:layout_height="wrap_content"
android:layout_gravity="center"
android:text="Twitter search term"
android:textSize="20sp"
android:textStyle="italic" />
<EditText
android:id="@+id/search_edit"
android:layout_width="fill_parent"
android:layout_height="wrap_content"
android:layout_margin="5dp"
android:background="#ffff66"
android:hint="Search..."
android:inputType="text"
android:padding="10dp" >
<requestFocus />
</EditText>
<Button
android:id="@+id/busqueda"
android:layout_width="wrap_content"
android:layout_height="wrap_content"
android:layout_gravity="center"
android:layout_margin="5dp"
android:onClick="searchTwitter"
android:text="Buscar" />
<ListView
android:id="@+id/list"
android:layout_width="wrap_content"
android:layout_height="wrap_content" >
</ListView>
</LinearLayout>
</RelativeLayout>
Y de momento en el onCreate() hacemos referencia a los objetos como de costumbre :
 public void onCreate(Bundle savedInstanceState) {
  super.onCreate(savedInstanceState);
  setContentView(R.layout.activity_main);
  act = this;
  listalist = (ListView) findViewById(R.id.list);

      palabra = (EditText) findViewById(R.id.search_edit);
         buscar= (Button) findViewById(R.id.busqueda);
         buscar.setOnClickListener(new OnClickListener(){
    @Override
    public void onClick(View v) {

     TERMINO=palabra.getText().toString();
     LISTA = new ArrayList();
    }
         });
 }
Si ejecutamos el proyecto veremos que no ocurre nada, ya que ahora vamos a implementar una serie de clases necesarias para lograr nuestro objetivo : Un feed de tweets.
También agregamos otros recursos, como el item_twitter para la apariencia de cada tweet : En la carpeta drawable :
<?xml version="1.0" encoding="utf-8"?>
<shape xmlns:android="http://schemas.android.com/apk/res/android">
<!-- color de fondo -->
<solid android:color="#ffffff"/>
<!-- curvatura esquinas -->
<corners android:radius="10dp"/>
<!-- padding para separar entre elementos contenidos y el borde -->
<padding android:left="8dp"
android:right="8dp"
android:top="4dp"
android:bottom="8dp"/>
<!-- borde -->
<stroke
android:width="3dp"
android:color="@color/colorTwitter"/>
</shape>
Y en la carpeta layout, la fila que insertaremos con datos distintos :
<?xml version="1.0" encoding="utf-8"?>
<LinearLayout xmlns:android="http://schemas.android.com/apk/res/android"
android:layout_width="fill_parent"
android:layout_height="wrap_content"
android:background="@drawable/cuadrotwitter"
android:orientation="vertical" >
<LinearLayout
android:id="@+id/contenedorTwitter"
android:layout_width="match_parent"
android:layout_height="wrap_content"
android:background="#ffffff" >
<ImageView
android:id="@+id/JSONAvatar"
android:layout_width="wrap_content"
android:layout_height="wrap_content"
android:layout_margin="5dp"
android:src="@drawable/ic_launcher" />
<LinearLayout
android:layout_width="fill_parent"
android:layout_height="wrap_content"
android:layout_margin="5dp"
android:orientation="vertical" >
<TextView
android:id="@+id/JSONusertwitter"
android:layout_width="wrap_content"
android:layout_height="wrap_content"
android:text="User"
android:textColor="@color/colorTwitter" />
<TextView
android:id="@+id/JSONTweet"
android:layout_width="wrap_content"
android:layout_height="wrap_content"
android:text="tweet"
android:textAppearance="?android:attr/textAppearanceMedium"
android:textColor="@color/colorTweet" />
</LinearLayout>
</LinearLayout>
</LinearLayout>
TwitterUser : Clase con parámetros identicos a los que nos dan, complementa a la siguiente clase Tweet, que toma también parámetros de twitter, lo que pasa que esta última se centra un poco más en parámetros del sistema, a diferencia con la anterior, que está definida para los parámetros de cada usuario.
public class TwitterUser {

 @SerializedName("screen_name")
 private String screenName;

 @SerializedName("name")
 private String name;

 @SerializedName("profile_image_url")
 private String profileImageUrl;

 public String getProfileImageUrl() {
  return profileImageUrl;
 }

 public String getScreenName() {
  return screenName;
 }

 public void setProfileImageUrl(String profileImageUrl) {
  this.profileImageUrl = profileImageUrl;
 }

 public void setScreenName(String screenName) {
  this.screenName = screenName;
 }

 public String getName() {
  return name;
 }

 public void setName(String name) {
  this.name = name;
 }
}

public class Tweet {

 @SerializedName("created_at")
 private String DateCreated;

 @SerializedName("id")
 private String Id;

 @SerializedName("text")
 private String Text;

 @SerializedName("in_reply_to_status_id")
 private String InReplyToStatusId;

 @SerializedName("in_reply_to_user_id")
 private String InReplyToUserId;

 @SerializedName("in_reply_to_screen_name")
 private String InReplyToScreenName;

 @SerializedName("user")
 private TwitterUser User;

 public String getDateCreated() {
  return DateCreated;
 }

 public String getId() {
  return Id;
 }

 public String getInReplyToScreenName() {
  return InReplyToScreenName;
 }

 public String getInReplyToStatusId() {
  return InReplyToStatusId;
 }

 public String getInReplyToUserId() {
  return InReplyToUserId;
 }

 public String getText() {
  return Text;
 }

 public void setDateCreated(String dateCreated) {
  DateCreated = dateCreated;
 }

 public void setId(String id) {
  Id = id;
 }

 public void setInReplyToScreenName(String inReplyToScreenName) {
  InReplyToScreenName = inReplyToScreenName;
 }

 public void setInReplyToStatusId(String inReplyToStatusId) {
  InReplyToStatusId = inReplyToStatusId;
 }

 public void setInReplyToUserId(String inReplyToUserId) {
  InReplyToUserId = inReplyToUserId;
 }

 public void setText(String text) {
  Text = text;
 }

 public void setUser(TwitterUser user) {
  User = user;
 }

 public TwitterUser getUser() {
  return User;
 }

 @Override
 public String  toString(){
  return getText();
 }
}
Clase Twitter : Esta clase nos sirve de apoyo para recoger los valores que nos va a devolver el objeto JSON
public class Twitter extends ArrayList{ private static final long serialVersionUID = 1L; }
Clase Authenticated : Es la que nos va guardar las variables de conexión necesarias para twitter :
public class Authenticated {
 String token_type;
 String access_token;
}
Vamos ahora con el tema "complicadillo"; A partir de la versión 3 de Android, las operaciones como recoger datos desde internet, se consideran operaciones costosas, entonces Android dió por echo que necesitábamos hacer uso de otro hilo, para que la aplicación no se quedase colgada.
He echo este programa con 3 formas de hilos, uno para autentificarnos en Twitter y parsear mediante JSON los datos, otro para insertarlos en el ListView y otro en el propio adapter para que mediante la URL del avatar de twitter, se descarguen las fotos y se muestren.
Se puede hacer sin el hilo para insertar los datos en el adapter, pero lo he puesto para ser más técnico :

//FUNCION QUE ENCAPSULA TODOS LOS DATOS Y SE LLAMA EN EL ONCLICK DEL BOTÓN QUE ANTERIORMENTE HEMOS PUESTO EN EL onCreate()
 public void downloadTweets() {
  ConnectivityManager connMgr = (ConnectivityManager) getSystemService(Context.CONNECTIVITY_SERVICE);
  NetworkInfo networkInfo = connMgr.getActiveNetworkInfo();

  if (networkInfo != null && networkInfo.isConnected()) {
   new DownloadTwitterTask(act).execute(TERMINO);
  } else {
   Log.v(LOG_TAG, "No network connection available.");
  }
 }

//HILO PARA AGREGAR LOS ITEMS AL ADAPTADOR
private class CargarListViewTask extends AsyncTask{
    Activity a;

 public CargarListViewTask(Activity a) {
  // TODO Auto-generated constructor stub
  this.a=a;
 }
 protected void onPreExecute() {
        // TODO Auto-generated method stub
        super.onPreExecute();
    }
 @Override
 protected BaseAdapter doInBackground(Void... params) {
  TweetItemAdapter adaptador = new TweetItemAdapter(LISTA,a);
  return adaptador;
 }
 @Override
 protected void onPostExecute(BaseAdapter adaptador) {
  super.onPostExecute(adaptador);
  listalist.setAdapter(adaptador);
        //pDialog.dismiss();
 }


}
 //Usamos ASINCTASK PARA OBTENER LOS TWETTS
 private class DownloadTwitterTask extends AsyncTask {
  final static String CONSUMER_KEY = "AQUI TU CONSUMER_KEY";
  final static String CONSUMER_SECRET = "AQUI TU CONSUMER_SECRET";

  final static String TwitterTokenURL = "https://api.twitter.com/oauth2/token";
  final static String TwitterStreamURL = "https://api.twitter.com/1.1/statuses/user_timeline.json?screen_name=";
  Activity activity;
  public DownloadTwitterTask(Activity actividad) {
   this.activity=actividad;
  }

  @Override
  protected String doInBackground(String... screenNames) {
   String result = null;
   if (screenNames.length > 0) {
    result = getTwitterStream(screenNames[0]);
   }
   return result;
  }
  // AQUI ES DONDE CONVERTIMOS LOS DATOS DEL JSON EN ARRAYLIST
  @Override
  protected void onPostExecute(String result) {
   Twitter twits = jsonToTwitter(result);

   for (Tweet tweet : twits) {
    Log.i("DATOS", tweet.getText());
    Tweet NEWtWitt=tweet;
    //INSERTAMOS EN LISTA
    LISTA.add(NEWtWitt);
   }
   System.out.println("LISTA CONTENIDO, numero tweets : "+LISTA.size());
   new CargarListViewTask(activity).execute();
  }

  // FUNCION DE APOYO QUE CONVIERTE EL STRING ENTERO POR REGISTRO EN DATOS DE UN ARRAYLIST
  private Twitter jsonToTwitter(String result) {
   Twitter twits = null;
   if (result != null && result.length() > 0) {
    try {
     Gson gson = new Gson();
     twits = gson.fromJson(result, Twitter.class);
    } catch (IllegalStateException ex) {
     // just eat the exception
    }
   }
   return twits;
  }

  // FUNCION DE APOYO QUE CONVIERTE LA AUTENTIFICACION JSON EN AUTENTIFICACION TIPO AUTHENTICATED
  private Authenticated jsonToAuthenticated(String rawAuthorization) {
   Authenticated auth = null;
   if (rawAuthorization != null && rawAuthorization.length() > 0) {
    try {
     Gson gson = new Gson();
     auth = gson.fromJson(rawAuthorization, Authenticated.class);
    } catch (IllegalStateException ex) {
     // just eat the exception
    }
   }
   return auth;
  }
  //FUNCION DE APOYO QUE HACE UNA PETICION HTTP PARA QUE PUEDA LEER JSON
  private String getResponseBody(HttpRequestBase request) {
   StringBuilder sb = new StringBuilder();
   try {
    DefaultHttpClient httpClient = new DefaultHttpClient(new BasicHttpParams());
    HttpResponse response = httpClient.execute(request);
    int statusCode = response.getStatusLine().getStatusCode();
    String reason = response.getStatusLine().getReasonPhrase();

    if (statusCode == 200) {

     HttpEntity entity = response.getEntity();
     InputStream inputStream = entity.getContent();

     BufferedReader bReader = new BufferedReader(new InputStreamReader(inputStream, "UTF-8"), 8);
     String line = null;
     while ((line = bReader.readLine()) != null) {
      sb.append(line);
     }
    } else {
     sb.append(reason);
    }
   } catch (UnsupportedEncodingException ex) {
   } catch (ClientProtocolException ex1) {
   } catch (IOException ex2) {
   }
   return sb.toString();
  }
 //FUNCION DE APOYO PARA REALIZAR LA PETICION POST CON SU RESPECTIVA AUTENTIFICACION Y DESPUÉS LA GET PARA
 //OBTENER LOS DATOS EN JSON
  private String getTwitterStream(String screenName) {
   String results = null;

   // CONECTAMOS CON LAS CLAVES
   try {
    String urlApiKey = URLEncoder.encode(CONSUMER_KEY, "UTF-8");
    String urlApiSecret = URLEncoder.encode(CONSUMER_SECRET, "UTF-8");
    // COMBINAMOS LAS CLAVES PARA SU USO
    String combined = urlApiKey + ":" + urlApiSecret;
    // Base64 encode the string
    String base64Encoded = Base64.encodeToString(combined.getBytes(), Base64.NO_WRAP);
    //OBTENEMOS EL OBJETO token
    HttpPost httpPost = new HttpPost(TwitterTokenURL);
    httpPost.setHeader("Authorization", "Basic " + base64Encoded);
    httpPost.setHeader("Content-Type", "application/x-www-form-urlencoded;charset=UTF-8");
    httpPost.setEntity(new StringEntity("grant_type=client_credentials"));
    String rawAuthorization = getResponseBody(httpPost);
    Authenticated auth = jsonToAuthenticated(rawAuthorization);
    // Applications should verify that the value associated with the
    // token_type key of the returned object is bearer
    if (auth != null && auth.token_type.equals("bearer")) {
     // NOS AUTENTIFICAMOS Y HACEMOS LA PETICION GET
     HttpGet httpGet = new HttpGet(TwitterStreamURL + screenName);
     // CONSTRUIMOS UN HTTP NORMAL Y LE INSERTAMOS LA AUTORIZACION REQUERIDA POR TWITTER
     httpGet.setHeader("Authorization", "Bearer " + auth.access_token);
     httpGet.setHeader("Content-Type", "application/json");
     // update the results with the body of the response
     results = getResponseBody(httpGet);
    }
   } catch (UnsupportedEncodingException ex) {
   } catch (IllegalStateException ex1) {
   }
   return results;
  }
 }
}

Ya sólo nos queda el adapter, que es un adapter sencillo, sólo que hemos extendido un hilo para que como anteriormente he comentado cargar las imágenes a través de una URL :
public class TweetItemAdapter extends BaseAdapter {

 private ArrayList tweets;
 private Activity a;

 public TweetItemAdapter(ArrayList tweets,Activity actividad) {
  super();
  this.tweets = tweets;
  this.a=actividad;
 }

 @SuppressLint("NewApi") @Override
 public View getView(int position, View convertView, ViewGroup parent) {

  View v = convertView;
  if (v == null) {
   LayoutInflater vi = (LayoutInflater)a.getSystemService(Context.LAYOUT_INFLATER_SERVICE);
   v = vi.inflate(R.layout.tweet_item, null);
  }

  Tweet tweet = (Tweet) tweets.get(position);

   if (tweet != null) {
    TextView user = (TextView) v.findViewById(R.id.JSONusertwitter);
    TextView mensaje = (TextView) v.findViewById(R.id.JSONTweet);
    ImageView image = (ImageView) v.findViewById(R.id.JSONAvatar);

    if (user != null) {
     user.setText(tweet.getUser().getName());
    }
    if(mensaje != null) {
     mensaje.setText(tweet.getText().toString());
    }
    if(image != null) {
     new DownloadImageTask(image).execute(tweet.getUser().getProfileImageUrl());


    }
   }

   return v;
 }

 @Override
 public int getCount() {
  // TODO Auto-generated method stub
  return tweets.size();
 }

 @Override
 public Object getItem(int position) {
  // TODO Auto-generated method stub
  return position;
 }

 @Override
 public long getItemId(int position) {
  // TODO Auto-generated method stub
  return 0;
 }

class DownloadImageTask extends AsyncTask {
  ImageView bmImage;

  public DownloadImageTask(ImageView bmImage) {
   this.bmImage = bmImage;
  }

  @Override
  protected Bitmap doInBackground(String... urls) {
   String urldisplay = urls[0];
   Bitmap mIcon11 = null;
   try {
    InputStream in = new java.net.URL(urldisplay).openStream();
    mIcon11 = BitmapFactory.decodeStream(in);
   } catch (Exception e) {
    Log.e("Error", e.getMessage());
    e.printStackTrace();
   }
   return mIcon11;
  }

  @Override
  protected void onPostExecute(Bitmap result) {
   bmImage.setImageBitmap(result);
  }
 }
}
Y vamos con ello, el resultado lo podreis ver aquí :
Podeis descargar el código fuente de thebestandroide con sólo compartir en facebook, twitter, linkedin o suscribirte a nuestro canal RSS más abajo.
NOTA : Hay que pasar por el primer post para conseguir las claves.


|


Este comentario ha sido eliminado por el autor.
ResponderEliminarQue bueno, una manera más divertida de twitear. Hace poco me habían hackeado el twitter pero ya lo logré solucionar, estaba en busca de esta aplicación para manejarla directamente. Me gusta mucho, me parece muy interesante, gracias por las instrucciones.
ResponderEliminarFuente: www.actualizarplaystore.net